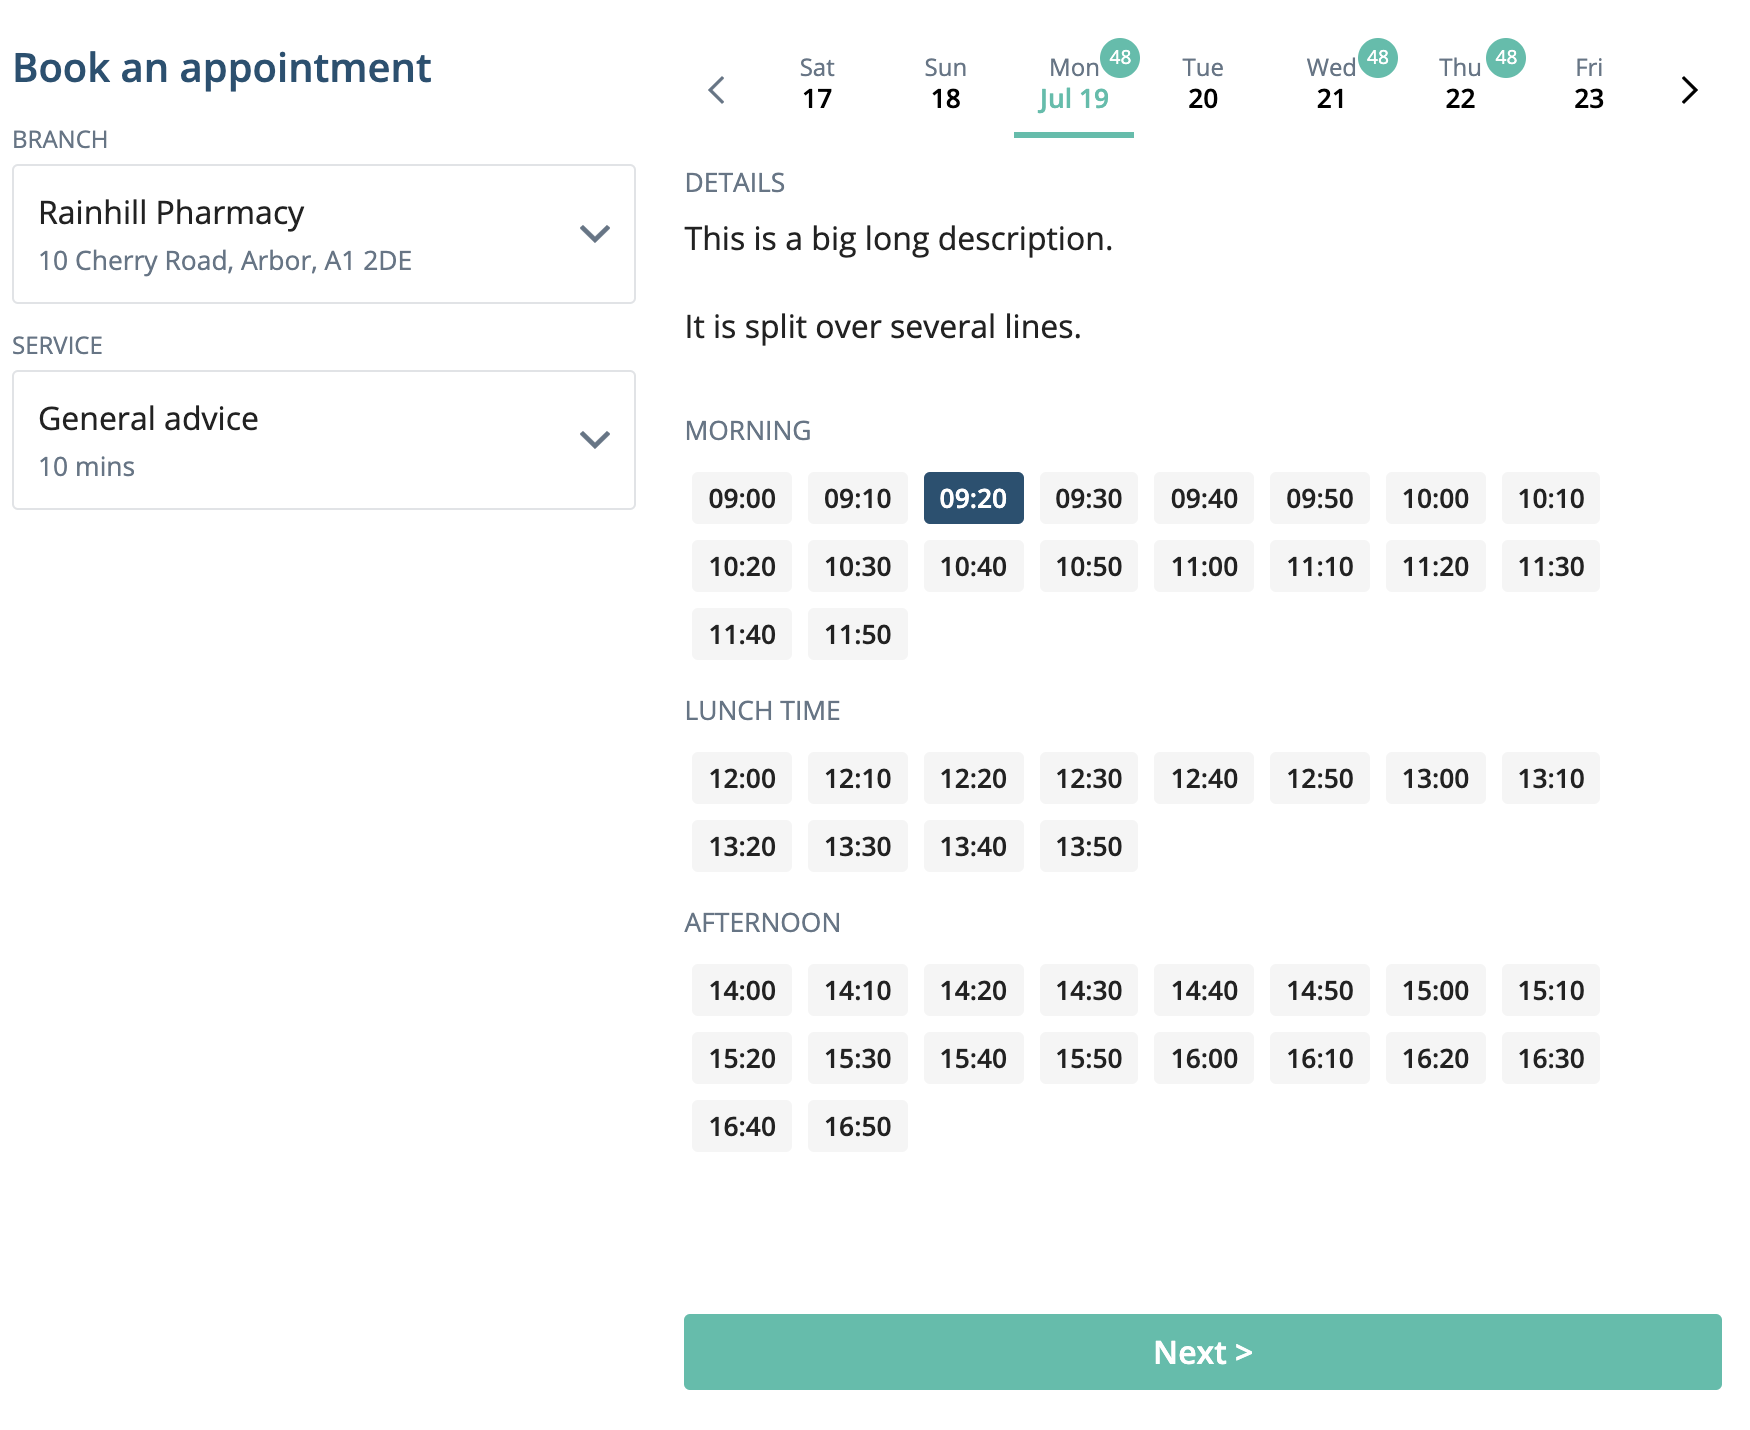
Quick book
The "Quick book" widget allows you to take appointment bookings through Clara on your own website. It allows the patient to choose a pharmacy in your group if applicable, and then select from the range of services you offer.
The time slots are grouped into "morning" (before 12:00), "lunch" (12:00-14:00), "afternoon" (14:00-17:00) and "evening" (17:00 onwards). Once selected, the "Next" button becomes active. Clicking it takes the patient off your site to a Clara-hosted page, which is automatically themed with the same "primary" and "secondary" colour defined in your CSS.
The Clara-hosted page asks for some details to complete the booking. You can have these details prefilled by passing the data through to the widget.

Installation
Make sure you have the polyfill if desired, and then add the following script:
<script src="https://developer.getclara.uk/scripts/clara-quick-book.js"></script>
The script will automatically load the required CSS for you, and defines a
custom element called clara-quick-book.
Note: you can pin a version if you like
Attributes
The clara-quick-book element has the folowing attributes:
| Name | Description |
|---|---|
branch | The ID of the branch that you want to accept bookings for |
organisation | Your organisation ID |
services | A comma-separted list of IDs of services to show |
featured | A comma-separted list of IDs of services to highlight as "featured" |
info | Extra info to pass through to the booking form (see below) |
You only need to supply one of branch and organisation. If you just set the
organisation attribute, the widget will allow the patient to select which of
your branches to book at.
The services field can be used to filter the services shown in the widget to
only those with the IDs specified. If you only specify one, it will be
automatically selected in the "Service" dropdown in the widget. The featured
attribute moves the services with the specified IDs to the top of the list and
highlights them as "featured".
Branch IDs can be obtained by looking at the bottom of the branch myClara settings page, where you will see text like:
Branch ID: 5f677c488e43e331f777e84f
Similarly, the bottom of the organisation myClara settings page will show you
the organisation ID, and the bottom of the edit page for any service will show
you the service ID for use in the services and featured attributes.
The info field can be specified either by setting the prop on the element using JavaScript:
document.querySelector('clara-quick-book').info = {name: 'Joe Blogs',email: 'joe@example.com',phone: '07400300200',address: {line1: '10 Birch Avenue',town: 'Arbor',postcode: 'A9 5VJ',},patientIntegrationId: '12345',};
Or using JSON on the attribute:
<clara-quick-bookbranch="604b46e8ed2b8d393b12644e"info='{"name":"Joe Bloggs","email":"joe@example.com","phone":"07400300200","address":{"line1":"10 Birch Avenue","town":"Arbor","postcode":"A9 5VJ"}}'></clara-quick-book>
Styling
Because the component uses the shadow DOM, you can't style arbitrary elements within it, just the container. For your convenience, we have provided custom CSS properties to let you customise certain aspects of the control. They are shown below with their default values:
clara-quick-book {/* the background color of components */--color-bg: #fff;/* the background color of scrollable regions */--color-list-bg: #f2f5fd;/* the default color of text */--color-text: #222;/* the color of text on dark coloured buttons */--color-text-light: #222;/* the color of text of secondary importance */--color-muted: #647687;/* where a component has a separate border colour, that colour */--color-border: #e0e3e6;/* the background color a component which is usually --color-bg changes to when moused over */--color-hover: #ecf6ff;/* for primary actions, e.g. the "book" button */--color-primary: #40bfaa;/* used for other things, e.g. time slot button color and headings */--color-secondary: #205072;/* the color of error message text */--color-danger: #b71a3e;/* an off-white background color used in a couple of places */--color-light: #f5f5f5;/* anything in the widget with rounded corners uses this setting */--border-radius: 3px;/* most clickable list items use this */--box-shadow: 1px 1px 4px 0px rgba(0, 0, 0, 0.1);/* any margins and padding use these settings *//* if your website has a lot of chunky spacing you can increase these to match */--space-1: 0.25rem;--space-2: 0.5rem;--space-3: 0.75rem;--space-4: 1rem;/* the font family used throughout the widget */--font-family: 'Open Sans', 'Helvetica Neue', Helvetica, Arial, sans-serif;/* the weight of normal text */--font-weight-normal: 400;/* if you want to use e.g. a semibold weight for emphasis, change this */--font-weight-bold: 600;/* the weight of headings */--title-font-weight: var(--font-weight-bold);/* the default font size */--font-size: 1rem;/* the smaller font size */--font-size-sm: 0.825rem;/* a very small font size, used for some labels and the footer */--font-size-xs: 0.75rem;/* an extremely small font size, currenly only used on the number indicators on the day buttons */--font-size-xxs: 0.6rem;}
Examples
The following example styling to give the widget a size of 400 by 600px. If you choose a different size, it's best not to go much smaller than that.
<style>clara-quick-book {width: 400px;height: 600px;}</style><clara-quick-book branch="5f677c488e43e331f777e84f"></clara-quick-book>
You could also use inline styles or a class name for sizing if you prefer.
The previous example will render a widget that accepts bookings for the
specified branch only. To allow the user to choose which of your organisation's
branches to book with, specify the organisation attribute instead:
<clara-quick-book organisation="5ff903999c7bb048fd6657f6"></clara-quick-book>
If you want to make use of the custom properties, e.g. to change the default font, you can just set them on the widget tag (or another selector that points to that tag, e.g. class):
<style>clara-quick-book {width: 400px;height: 600px;--font-family: 'Segoe UI', sans-serif;}</style><clara-quick-book branch="5f677c488e43e331f777e84f"></clara-quick-book>
Note that you only have to specify the ones that you want to override, and the rest will take on the default values.